Quick Notes on Photographing your Work
The Goal: Create a professional image of your work that is evenly lit and closely resembles the color and quality of the piece.
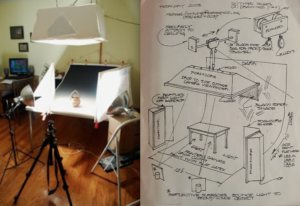
Lighting: Avoid flashbulbs and use diffused light. Light your work from the left, right, and above, and pay attention to the consistency of temperature and strength of your bulbs.
Space and efficiency: A Pop-up table and collapsible lighting and softboxes are a great way to ensure ease of setup and storage. Store your backdrop paper in a large cardboard tube and avoid dragging your work on the surface while shooting. Prepare a kit that contains your clamps, extension cords, props, etc so that they are ready next time you shoot.
Editing: When opening your image for editing use the “open as” option in photoshop. Select camera raw from the drop-down. This opens the photo in a mini photo editor where you can do most of your editing with sliders.
Backdrop Variety
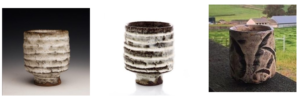
No matter how you photograph your work, you are providing a context to view the work within. Here are a few notes on different types of backdrops benefits and drawbacks. More... Gray: A gray background is highly adaptable and can change dramatically depending on your lighting and distance from your subject. It tends to give the photo’s color a muted quality. White: A pure white background gives the illusion that your piece is floating. No clues about depth or spatial relations are present which can leave it open for your audience to imagine it anywhere. White pieces are difficult to shoot but can work if you put the time into editing. A white background will also give high contrast and vibrant colors. This backdrop will have the most dramatic difference from an in-person experience with the work. In Action: These types of shots can communicate more specific information about where your work fits in the world. These types of images are best for social media vs application purposes. *The varitone backdrops have white backs thus giving you both options in one backdrop.
Tips for Dealing with Shiny Work
Three techniques from two artists. More... “Take multiple images moving the light source with every shot. Maintain your area of focus by shooting in a manual focus setting (do not move or alter the camera’s stance or location, just the lights). After you have gathered an abundant amount of images, you stack the images in Photoshop by using layers. You can then erase any hot spot or unwanted dark area from the work. You can also change the opacity on specific layers to create fades and gradations. It takes a bit of practice, but the end result can lend itself to be rather fantastic.” Brooke Cashion’s Technique “My undergraduate photography professor shared this tip with me. Buy yourself an aersol deodorant like “right guard”. Avoid anything fancy that claims to spray clear, you want the film. Spray small spurts of it on the hot spot on your piece and avoid getting it on your backdrop. In effect you are airbrushing a little bit of matte surface right where you need it. This technique is not great if you are shooting in a closet… Another alternative is to get friendly with the clone stamp tool on Photoshop. This is my preferred method.”
A Ceramic Artist Photo Practice
Essential Items:
- A camera that can shoot at high resolution (You can get by with a point and shoot, but it’s best to get something that can shoot RAW files).
- A basic tripod
- Roll of grey paper that is 2’-4’ wide and 4’-6’ long
- A piece of white foam core for reflecting light onto the work
- Photoshop Elements (this has all of the basic tools that regular Photoshop has, but comes with a significantly lower price tag)
- A clamp light that supports a 250 W bulb (usually this will have a ceramic housing in it rather than plastic)
- 250 W Tungsten Bulb
- Homemade lightbox
More... “I have slowly over the years added equipment to my photo stash. Many of these pieces can be expensive to justify, but I have found in the long run, they are well worth the investment with the time they save and the quality of images you can create and replicate easily. I use a 250W “clamp light” in which I removed the clamp and instead use a piece of wire that acts as a handle on the lamp. To this wire I attached a long piece of cord that I use to hang the lamp from the ceiling. I place the lamp inside of the Softbox which is held together with a metal speed ring. When I am not shooting images, I have a series of pullies that I can hoist the Softbox up to the ceiling so it is out of my way. The nice part about having this set-up is that I can easily drop the lamp down and push up a table to shoot work on quickly and easily. For my backdrop/shooting area, I have set it up so I can push my table against the wall and nail the top of the backdrop to the wall and clamp the bottom part to my work table. I drop my softbox light so it is about 2 feet about the tabletop. In addition to having my lights on a pulley system, I have a bracket attached to the wall that I can wrap the cord around to adjust the height above the table easily. Depending on the shape of the piece, I may want the light to be higher to lower. I also use a zip disc that has gold on one side and white on another. I use this rather than a piece of white foam core, simply because if I have a matte surface, the gold side gives me better lighting and the white side gives good light without being reflective on something that is glossy. It’s not a huge expense (~$20), plus it folds up easily into a little pouch that I can store on a bookshelf. I personally use Photoshop Elements to edit all of my images. I had debated about buying regular Photoshop, but my husband had already purchased Photoshop Elements to dabble with some of his photos and I found that it had everything that I needed. And with a savings of $400, I must say, for the average artist, this will have all you need. When I shoot my images, I always shoot in RAW because you get significantly higher image quality than if you shoot in .jpg. I didn’t always do this, but I found the colors to be much truer and the lighting to be better and it saved me a lot of time on the editing side. I also still bracket all of my images (shoot the shutter speed 1 notch above and 1 notch below the correct shutter speed) to make sure that I have the right lighting because sometimes it is difficult to see exactly in the LCD screen. I also usually shoot a variety of angles of each piece. For one piece of work, I may end up with 40 or more total images, but then I narrow it down to 3. When digitally filing my work I had a difficult time keeping everything straight. Now I file each group of work in a folder by year (for example 2012). For each image, I have a .psd file (photoshop), high rez .jpg file, and a low rez .jpg file. I tend to file my work with the object first, color second, the number of that type of piece, and then differentiate between views with a letter and then the year. I know that sounds complicated, but it seems to work well. An example would be “Cup_blue1A_2012.jpg” another view would be “Cup_blue1B_2012.jpg” and a different blue cup all together would be “Cup_blue2A_2012.jpg” Places where I have purchased photo equipment: From Camera to Computer There are many different brands of digital cameras that have different protocols for taking images from the camera and storing them on your computer’s hard drive. Many cameras have a USB cable or a docking system for the camera’s memory card. It is important to read the manual that comes with a camera to understand its procedures and use. Becoming familiar with your digital camera is necessary for making good slides; because of the immediacy of results, it is easy to experiment with different settings such as shooting with or without a flash or adjusting the white balance. Different brands function differently and their menus are set up according to their own design. Regardless of brand, it is always best to shoot at the highest resolution and largest file size, you can lower the resolution later if needed, but you can never increase the resolution of an existing photo. Choosing a Digital Camera When buying a digital camera for shooting slides there are considerations to take into account that wouldn’t apply for general personal use. Cameras can range into thousands of dollars, but for our purposes, an effective camera that has the options and abilities needed for shooting slides should range from 400 to 700 dollars, and as technology progresses these prices should lower. This is a moderate investment in equipment, while not accepting any significant compromises in performance. What you should look for in a camera: Image Editing Due to differing requirements by the venues that ask for digital files, it is almost never a possibility to send your digital slides without adjusting them in image editing software. Software such as Photoshop is capable of amazing effects and can be an integral tool in your photography repertoire. Use of such programs does bring up ethical issues, what is and is not acceptable isn’t always clear. The purpose of slides is to accurately represent studio work and adjusting the digital representation of work to hide or improve its quality is at best morally gray. With that said programs like Photoshop can be used to adjust digital images to more closely resemble the work it represents. There is always that scratch on the backdrop or old lighting that causes mid-tones or highlights to have an irregular hue. Once again the benefits of digital are easily seen, instead of buying a new backdrop or re-shooting all of your slides because they are too dark, you can adjust or correct many of these problems. There are many different image-editing programs, too many to name them all. Photoshop has become one of the leading standards in photo manipulation and is one of the most advanced programs out there. Photoshop can be a complex program; but for purposes of slide editing, there are many simple functions and commands that with a minor amount of training, anyone could use. Whatever program you decide to use it would behoove you to commit to training yourself in its use. Many community darkrooms now offer classes in Photoshop and digital photography, schools have introductory courses and there are many self-help tutorials online and in print that can teach the basics of photo manipulation. The sooner you become acquainted with the technology the better off you will be.
More information on photographing your work:
Used Photography Gear